
So I'm a little behind posting up this tutorial. I blame the current chibi adventure: the birthday awareness month! This gets full swing around mid-August with the influx of impulse birthday buys only to find myself, time after time, giving in to those huge brown eyes and surrendering up yet another pre-birthday gift! Princess was born on Labor Day three years ago, just six days before mine! Yikes! Nonetheless, there's excitement afoot everyday!


On with the tutorial!
What you will need:
- an old pair of leggings that fit your little one well to use as a pattern
- 3/4 yard knit fabric for the pants (if you like the look, you could use knit scraps in different patterns to create an awesome mixed-matched look.)This is enough for 3T-6. use up to a yard for sizes up to 12.
- contrasting knit fabric for the cuff
- tailor's chalk
- ballpoint sewing machine needle (size 80). Using these will ensure the longevity of your knit fabric since regular needles can cut into the fabric.
- scissors or fabric rotary cutting tool.
- 1" wide non roll elastic the size of the waist
- clothing tag (a scrap ribbon about 1 1/2" long would totally work) (optional, since these are the same front and back, but it can be good to help your littlen' get dressed on their own. )
Okay!
 1.) Fold your old leggings in half. Place them on top of your knit fabric, placing them on the fold of the fabric like in the picture. Draw a chalk line around the leg with a small seam allowance of about a 1/4". I know it looks bigger in my picture but that is because I couldn't find an old pair to use since we just went through a growth spurt, so i just made my allowance a little bigger. On top, add a two inch seam allowance for the elastic to be folded over for the waistband.
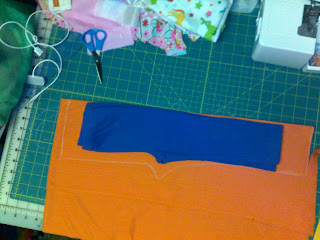 2.) You don't have to add a hem allowance since we're adding the cuff to the bottom. Once again, disregard the extreme inches that i needed to add to the bottom of my pair. Cut two of this piece on the fold of your fabric.
 3.) You should have two of something that when folded look like the picture. Get a piece of contrasting fabric the width of your pant bottom and however long you want the cuff to be times two for the fold, plus a 1/2" seam allowance. For this pair i made the length about 2".
 4.) This is the settings I used on my serger. I serged the pant hem and then all around the cuff pieces.
 5.) Next line up the cuff just above the pant hem, right sides together. Stitch along just outside the serged edge on the cuff using a stretch stitch. Slightly stretch the cuff fabric without stretching the pant fabric as you stitch.
 Don't worry about the leftover fabric right now.
 6.) next fold the cuff over the hem and under the back of the pant. Make sure the serged edge is lined up with the stitching line of the pants underside. You could pin this or just press this and make sure that the edge doesn't slip below the stitch line.
 7.)Now top-stitch an 1/8" below where the cuff meets the pant and then again an 1/8" right above the edge of the pant. I like the look of a straight stitch but know that it's not durable so I use a triple stitch to ensure it's wear.
 8.) This is what you should have now. If you're not using a serger, cut this bit off now.

This is what you should have now. The underneath and the top. Repeat with other leg.
 9.) Fold the leg in half with the right sides together and serge up the inside of the leg, but stopping right where the crotch seam ends. DO NOT SEW ALL THE WAY UP THE LEG. Then stretch stitch the leg just outside the serged edge and just alongside it, also ending at the crotch.
 10.) One pant leg. Whoo-hoo! Now repeat with the other leg.
 11.) Turn ONE leg right side out and slip it inside the other leg, making sure to keep the seams aligned. Now the legs are right sides together.
 12.) Make sure the bottoms of the legs are aligned as well.
 13.) Now, flatten out the top, and pin along the "U" area.
 14.) Serge along this line.
 15.) A little trick to secure your serged chain at the end is to serge just a stitch or two beyond the fabric edge and then flip it and serge the chain along the edge a tiny bit then off the fabric and snip off the rest. For an easy start hiding a chain, take the chain and line it up on top of the fabric and along the right needle, then serge!
 16.) Once again stretch stitch, this time along the "U".
 17.) Pull the one leg out. Oh yeah! They're starting to look like pants! Now serge around the top of your pants.
 18.) If you are adding a tag, follow this step. Pick a back to your pants, and then take your ribbon or tag and pin it to the front and center of the back of your pants, just above your serged edge. if using a ribbon, fold it in half. Stitch in place.
 19.) Get a length of elastic the exact size of your little one's waist. It could even be an inch tighter if you want to make sure they don't fall off. Stitch the elastic in a loop using a triple stitch in the shape of a box and then an "X" inside of the box. This is a box stitch.
 20.) Fold the top down to make a casing for the elastic. Place the elastic around and inside the fold.
 21.) Top view, pants inside out. Don't worry that it's bunchy around the elastic right now. Just pin the elastic in four places: Middle front, middle back, and half way between those marks on the left and on the right.
 22.) Next we're going to stretch around the elastic, right on top of the serged edge, making sure not to stitch into the elastic. Stretch the elastic to the fit of the casing being careful not to stretch the knit itself.
 23.) Ta-da! You're done!


Silly family pic, and me with my new "my little pony" hair! I hope you liked the tutorial, if you have any questions, by all means, email me!
2 comments:
that was very informative and i feel i can make these pants now no problem. :)
THEY ARE ADORABLE! I love it and I'd like an adult pair! :)
Post a Comment