
the chronicles of stitching, chasing, and loving my little chibi princess!
Thursday, February 23, 2012
sew long!
I've felt like I didn't blog on here as often as I should and then life just hit our little family like a tornado and now we are surviving out in Portland, OR! With all those changes, and the new year, I just felt my blog needed as clean a slate as our little family's did! So come by and check out my new blog, more dedicated to sewing: sewchibi.blogspot.com! I hope to see you there!!!!!!
Thursday, July 14, 2011

Tuesday, April 12, 2011
apologies from the lazy blogger
Aaaaaahhhhhhh...!
So as you might have noticed, I've been away. Far, far away, it seems. And while I feel excuses shouldn't be made here is a run down of the laest chibi adventures:
Big things first:
Azriella is officially going to be a sister!!!
After about two years of trying, complete with ups and incredible downs, we are finally safely into our third trimester! We are expecting our newest critter around July 5th! It has been a pretty uneventful term so far (which has been a delightful change), happily sicker in my first trimester than I've ever been with my last for pregnancies. THIS is why I've been soooo lackadaisical with blogging (frankly, with a lot of things!). I've been p.o.o.p.e.d. I've still managed to crank out the obligatory holiday outfits for myself and Azriella, and a dress or two for my Etsy shop, maternity sirts to cover my big ol belly, and little more than that. I have a long list of sewing to dos that I need to make a dent in, before baby arrives! We're so excited!!!
We finally became grownups as we just adopted our first car payment! Yeay! A necessary evil we've been avoiding since Philly isn't the type of city that completely requires having a vehicle. But with new littlens come new obstacles! This bit of news is especially pertinent to the next bit of news:
We've finally been officially house hunting out west and we are getting closer and closer to being rid of Philthadelphia! We have a few prospects, all in or around the Portland area.
So I apologize sincerely for been away so long, but as you now know I've been hugely busy (but mostly with naps ;-)
Stay tuned. I do plan to put up a tute or two soon!!!!!
Thursday, September 23, 2010
survival of the tutorials!

Here's what I'm thinking:
- "the romero dress" sew along. My husband and I are avid horror movie lovers (he more so than I). Probably my current favorite is Dawn of the Dead written and directed by George A. Romero. It's funny, gruesome, period-esque yet it's cinematography stands the test of time, and it's made by the guy who has single-handedly epitomized the way we think of zombies. I named this post after his newest film, Survival of the Dead. I could go on and on, but let's just suffice it to say that it influenced me enough to plan on making a dress as an homage to him, and actually follow through with it! Whew! So, I made what I call "the romero dress" and called it as such as I gathered ideas and plans on how to make a dress that was horrid and adorable, bloody but not messy or uncomfortable to wear.
So, this would be a sew along through the process of making a truly scary dress for your little chibi zombie (and let me tell you, you can't find good zombie clothes for girls, lol! I've tried! When Puppy was one, we went out for Halloween as a family from the 80's that went to Disneyland and got attacked by zombies. Puppy was a little zombie Minnie Mouse!)
- Quick and practical hooded poncho with scarf
- bringing back the real kimono sleeve
- three pocket ruffle apron (for mammas!)
- the petticoat for girls (notice I didn't say pettiskirt!)
- the patchwork pettiskirt
- and the Edwardian style Disney character family sew along for Halloween (this'll probably come in October!)
Wednesday, September 15, 2010
green eggs and tea princess skirt: a tutorial!
I have been in a bit of a scurry these days as the Birthday Awareness Month has come and gone, but I'm ready to refocus, regroup, and reward you all with some digs that'll put the "fun" back in "fundamental" for fall (man, am I a cornball ;-)!
I made about 97% of Puppy's summer wardrobe and now I'm started on fall items!
As a motivator, I've signed up for the Creative Maven's Sew 5 Challenge. First up, I present to you, the Green Eggs and Tea Princess Skirt!
Green Eggs and Tea Princess Skirt
you will need:
- one length of fabric for main skirt (anything non-scratchy is my rule for kiddos)
- one length of overlay fabric (same weight or lighter than main skirt fabric)
- 3/4"- 1" non roll elastic
- large safety pin
- scissors
- straight pins
- a curved ruler or a compass
- pinking shears (optional)
- ribbon or tag (optional)
- about 30 mins
1. ) To decide how much fabric you need take your subject's waist measurement (in my case, about 19") and multiply it by at least 1.5 but up to three times the width of your waist measurement. I'm using about 42" of fabric by about 13" (I used the selvage of my fabric as the hem, so if you are intending to add a bottom skirt hem, I'd add a 1/2" to make a neat rolled hem or 1" if you like the look of a deep hem. ) And remember: the more fabric width, the poofier the skirt. This example is a little over two times the waist measurement
2.) Now, to prepare your top layer, use the same width as your main piece (in my case 42") and then add about three inches (for the overlap) and subtract about two inches from the length (so my length is about 11"). From there, fold the fabric in half width-wise and make a gentle curve upwards (in my example I started at 13 and 1/8" and curved upward until about 1.5" from the top).

3.) If you lay out your overlay fabric right side down and then fold the main skirt fabric from both sides into themselves with the opening in the back and then fold the overlay sides into themselves overlapping about three inches on top of each other, you'll get a rough view of what your skirt will look like.

4.) Serge or finish (to finish on a conventional sewing machine, zigzag close to the edge and or cut the remaining edge with pinking shears keeping careful not to snip into your stitches) the top and sides of the main skirt piece, then, serge or finish only the top of the overlay piece. To finish off your serged chain, I recommend that when you reach the end, slowly chain off about two extra stitches and then wiggle the fabric carefully off the the end and then flip the fabric over and place it close to the edge of the right needle but being careful not to get your stitches caught under the blade, then serge on top of your already serged seam and then sharply work the fabric off the stitching plate by guiding it off diagonally.

5.) Next we're going to finish the rest of the overlay piece. For this I used a narrow rolled serged hem by taking out the left needle and removing it's thread. Then I set my serger to it's rolled hem settings (narrowest stitch width and length), remove the stitch finger (refer to your serger handbook if you don't know what this is), and then set my tensions to the settings below. It is imperative, i.m.e. (in my experience) that if you are going to use a tension setting for your lower looper of 5 or higher, you must use high quality serger thread. I use Guttermann.
If you do not have a serger or don't feel comfortable using one yet, I would zigzag stitch about a half an inch in then clip into the seam allowance every couple of inches all along the curve, and then do a narrow rolled hem with a stitch length of about 3.5 or 4.
If you're not comfortable with that (hey, I just recently got better at curved hems, and my next option was my go to move for about a year!), zigzag the edge of the fabric then get some lace, baste it to the fabric with the edges together, then iron the lace down and topstitch close to the fabric's edge. (If you have any questions on finishing, leave me a comment below!).


6.) When doing the serged narrow rolled hem, make sure you have the right side of the fabric up.

7.) This is what your easy peasy narrow rolled serged hem should look like. Isn't it neat?!

8.) Stitch the main skirt fabric together along the short sides. Then, turn the skirt right side out and edgestitch (once again assume a stitch length of 3.5 or 4) about 1/4" from the seam.

9.) When you reach the end, turn the fabric (with the needle in the fabric) stitch two stitches, and then stitch all the way back up about 1/16th from the edge. This creates a cute, clean, professional look and secures your seam!

10.) Next find the middle back of your overlay piece and match that up with the seam on your main skirt piece. Pin here and then all around the skirt, keeping in mind to overlap the front about three inches (or whatever it would be to make the skirt even with the main skirt all the way around). Make sure the overlap is centered. Then stitch from the middle of the overlap through the three layers (remember: it will be three layers for only about an inch and a half and then it will be two layers).

11.) Fold down about 1/4" from the top and press (or if your edge is serged, just finger press it down as you go). Then baste all around the skirt.

12.) If you're adding a tag place it right above your basted stitches with image or text facing you as you stitch. I recommend triple stitching the edges only. If you want to use a scrap of ribbon to indicate the back of the skirt, get a bit of ribbon about two inches long, fold it in half and pin it under the basting stitches of the back seam. You stitch it down in the last step.

13.) Fold the skirt top over a little over an inch, press, then stitch down to the left of your basting stitches all around the skirt.

14.) This is what it should look like now.

15.) To decide how much elastic to use, take your waist measurement and subtract an inch. Make sure not to stretch it when you measure, and then cut. Grab your largest safety pin and pin it to one end of your elastic. Work your elastic all the way through your casing. Make sure you pin the other end of the elastic to the casing opening so that you don't lose your elastic.

16.) Pull the elastic ends together and overlap them about an inch. Then either zigzag back and forth to secure the elastic or do a box stitch (see below). Stitch a box and then stitch an "x" inside from corner to corner.

16.) Release the elastic, and stitch the opening closed. If you are using ribbon as a tag for the back, place the folded piece under to the basted stitches and then stitch the opening closed! Done!!
Front

Back

There are countless ways to embellish this skirt to make it your own:
- gather a ruffle, and add it to the hem.
- add a large bow or flower to the front.
- add pockets
- instead of cutting the overlay on the fold, consider making it two pieces and round out the other end. Then just overlap the top in the center front and in the center back. This gives a Cinderella feel to the skirt.
- Consider leaving out the elastic altogether, making a bodice top of your choice, and then gather the skirt to the bodice bottom.
Tuesday, August 31, 2010
the birthday playland adventure!
Yesterday was Puppy's 3rd Birthday party! It was an incredible time!
 She got to play with horsey toys, tea party houses...
 ...ride on toys, tools, and chalkboard walls...
 ...an undersea toddler grotto filled with puzzles and musical toys...
 ...hidden treasure...
 ...invisible dancing shoes...
 ...super totally fantastic mazey-climby-slidey-mabob gym with swirly tubes and treacherous net scaling...
 ...rock climbing walls and trikes and crane games and cars... and of course...
 ...moon bounces (times two!), so good you have to bring your newest my little pony friend to share in the fun!
We only wish we could have more time to play...
 ...And while it was sad to leave...
 ...all in all it was a magical day for everyone! Yaaaahhooo!!!


We only wish we could have more time to play...


Wednesday, August 25, 2010
Raining wine and unicorns, part 3. //CUFF LEGGING TUTORIAL!//
So I'm a little behind posting up this tutorial. I blame the current chibi adventure: the birthday awareness month! This gets full swing around mid-August with the influx of impulse birthday buys only to find myself, time after time, giving in to those huge brown eyes and surrendering up yet another pre-birthday gift! Princess was born on Labor Day three years ago, just six days before mine! Yikes! Nonetheless, there's excitement afoot everyday!


On with the tutorial!
What you will need:
- an old pair of leggings that fit your little one well to use as a pattern
- 3/4 yard knit fabric for the pants (if you like the look, you could use knit scraps in different patterns to create an awesome mixed-matched look.)This is enough for 3T-6. use up to a yard for sizes up to 12.
- contrasting knit fabric for the cuff
- tailor's chalk
- ballpoint sewing machine needle (size 80). Using these will ensure the longevity of your knit fabric since regular needles can cut into the fabric.
- scissors or fabric rotary cutting tool.
- 1" wide non roll elastic the size of the waist
- clothing tag (a scrap ribbon about 1 1/2" long would totally work) (optional, since these are the same front and back, but it can be good to help your littlen' get dressed on their own. )
Okay!
 1.) Fold your old leggings in half. Place them on top of your knit fabric, placing them on the fold of the fabric like in the picture. Draw a chalk line around the leg with a small seam allowance of about a 1/4". I know it looks bigger in my picture but that is because I couldn't find an old pair to use since we just went through a growth spurt, so i just made my allowance a little bigger. On top, add a two inch seam allowance for the elastic to be folded over for the waistband.
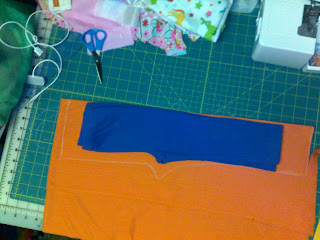 2.) You don't have to add a hem allowance since we're adding the cuff to the bottom. Once again, disregard the extreme inches that i needed to add to the bottom of my pair. Cut two of this piece on the fold of your fabric.
 3.) You should have two of something that when folded look like the picture. Get a piece of contrasting fabric the width of your pant bottom and however long you want the cuff to be times two for the fold, plus a 1/2" seam allowance. For this pair i made the length about 2".
 4.) This is the settings I used on my serger. I serged the pant hem and then all around the cuff pieces.
 5.) Next line up the cuff just above the pant hem, right sides together. Stitch along just outside the serged edge on the cuff using a stretch stitch. Slightly stretch the cuff fabric without stretching the pant fabric as you stitch.
 Don't worry about the leftover fabric right now.
 6.) next fold the cuff over the hem and under the back of the pant. Make sure the serged edge is lined up with the stitching line of the pants underside. You could pin this or just press this and make sure that the edge doesn't slip below the stitch line.
 7.)Now top-stitch an 1/8" below where the cuff meets the pant and then again an 1/8" right above the edge of the pant. I like the look of a straight stitch but know that it's not durable so I use a triple stitch to ensure it's wear.
 8.) This is what you should have now. If you're not using a serger, cut this bit off now.

This is what you should have now. The underneath and the top. Repeat with other leg.
 9.) Fold the leg in half with the right sides together and serge up the inside of the leg, but stopping right where the crotch seam ends. DO NOT SEW ALL THE WAY UP THE LEG. Then stretch stitch the leg just outside the serged edge and just alongside it, also ending at the crotch.
 10.) One pant leg. Whoo-hoo! Now repeat with the other leg.
 11.) Turn ONE leg right side out and slip it inside the other leg, making sure to keep the seams aligned. Now the legs are right sides together.
 12.) Make sure the bottoms of the legs are aligned as well.
 13.) Now, flatten out the top, and pin along the "U" area.
 14.) Serge along this line.
 15.) A little trick to secure your serged chain at the end is to serge just a stitch or two beyond the fabric edge and then flip it and serge the chain along the edge a tiny bit then off the fabric and snip off the rest. For an easy start hiding a chain, take the chain and line it up on top of the fabric and along the right needle, then serge!
 16.) Once again stretch stitch, this time along the "U".
 17.) Pull the one leg out. Oh yeah! They're starting to look like pants! Now serge around the top of your pants.
 18.) If you are adding a tag, follow this step. Pick a back to your pants, and then take your ribbon or tag and pin it to the front and center of the back of your pants, just above your serged edge. if using a ribbon, fold it in half. Stitch in place.
 19.) Get a length of elastic the exact size of your little one's waist. It could even be an inch tighter if you want to make sure they don't fall off. Stitch the elastic in a loop using a triple stitch in the shape of a box and then an "X" inside of the box. This is a box stitch.
 20.) Fold the top down to make a casing for the elastic. Place the elastic around and inside the fold.
 21.) Top view, pants inside out. Don't worry that it's bunchy around the elastic right now. Just pin the elastic in four places: Middle front, middle back, and half way between those marks on the left and on the right.
 22.) Next we're going to stretch around the elastic, right on top of the serged edge, making sure not to stitch into the elastic. Stretch the elastic to the fit of the casing being careful not to stretch the knit itself.
 23.) Ta-da! You're done!


Silly family pic, and me with my new "my little pony" hair! I hope you liked the tutorial, if you have any questions, by all means, email me!
Subscribe to:
Posts (Atom)